About the time you;re reading this (if anyone's out there) I will be headed North to do some canyoneering near Vancouver. It’s tough to bring cameras canyoneering. In the past, I’ve spent a fair bit of blog space writing about camera bags and photography accessories. It may seem like a lot, but in the world of adventure sports I find it a challenge to safely carry a camera during certain activities. And when I say safely, I’m not just talking about not destroying my camera. In a canyon, I’m in and out of a harness, on and off ropes, cliff jumping, sliding rocks, and a mistake can be costly. I’ve been slowly revamping my carrying system on each trip and the latest setup is what I have listed here. If you’re just starting out this may give you a few tips.
CAMERA AND HOUSING
My camera of choice deep in a canyon is my Canon Powershot G15. It has a wide aperture range starting at F/1.8, can shoot in RAW mode, records full 1080p files in 30fps, and comes in a compact package. The other huge advantage for me was the cost of the underwater housing. At just over $150 it was a more affordable solution than the $1800 version for my Canon 7D Mark II DSLR. The one aspect of the housing that I’m still working out is how to keep water from forming droplets on the lens window. I’ll have something worked out before my next trip and I’ll give you an update.
I took the G15 and housing on my last canyoneering trip through Das Boot and the Subway in Zion National Park, but I found the camera was often swinging in the way and wasn’t secure enough for down-climbing or rappelling. In fact, several times my housing took a fair beating against rocks and the canyon walls.
Another great camera to take is a GoPro. I’ll be taking two GoPro HD Hero2’s with 16GB cards with me to British Columbia. This is enough for almost 3 hours of footage each, not to mention the option of photo bursts and time lapses. I need to expand my array of attachments for the GoPro, but I’ll be taking a helmet strap and the standard base on this trip.
CAMERA BAG

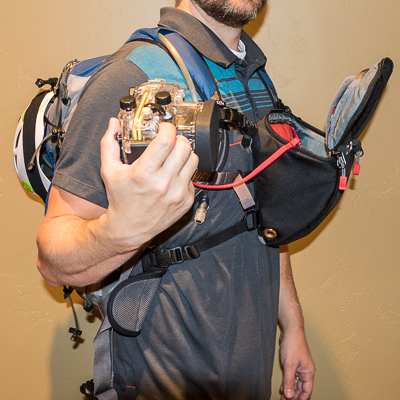
Clik Elite Standard SLR
Now for the good stuff! As far as a bag goes, I’m taking a modified Clik Elite chest carrier along with my REI brand daypack. I’ll be placing the camera and housing in the top-loader for safe-keeping during technical times, but maintain easy-access to this equipment during the remainder of the canyon. This Clik Elite bag came with Velcro buckles for attaching to external backpacks and daypacks, and I’ll be attaching mine to my REI daypack. I’ve modified both the Clik Elite harness and my daypack to have grommets in the bottom for draining water. Inside the daypack I carry a 8L Sea to Summit dry bag for dry clothes, wallet/keys, batteries/cards, emergency items, etc. and a 13L Sea to Summit dry bag to protect my camera bag with DSLR and lenses. Everything else gets stuffed in the bag.
Adding grommets to the bags was a simple and cheap solution that makes a world of a difference. I purchased a grommet kit from Harbor Freight and added the grommets myself. Another great feature of the bag is the camera tether. It features a small snap for easy removal, and helps keep the camera from dropping where I can’t retrieve it.

Clik Elite Chest Carrier with REI Daypack
Canon G15 and Underwater Housing
A little side note that warrants repeating is that SD cards are waterproof. My G15 and the GoPro’s take SD cards as well as my Canon 7D Mark II. Once in the past, I sent my camera swimming with CF cards and I was very lucky to retrieve all of the images. Just to be safe, I now use SD cards whenever possible.
CONCLUSION
Well that’s the low-down on my canyoneering photography setup. Let me know if you have any questions.